Sway-A-Way (SAW) Installation
This is a pictorial version of the installation that I did on my Tacoma. It is a record of my own personal experience and is NOT intended to be a
replacement for the manufacturers installation instructions. Click here for a text version of this document.
Part II (continued) - Installing the new units.
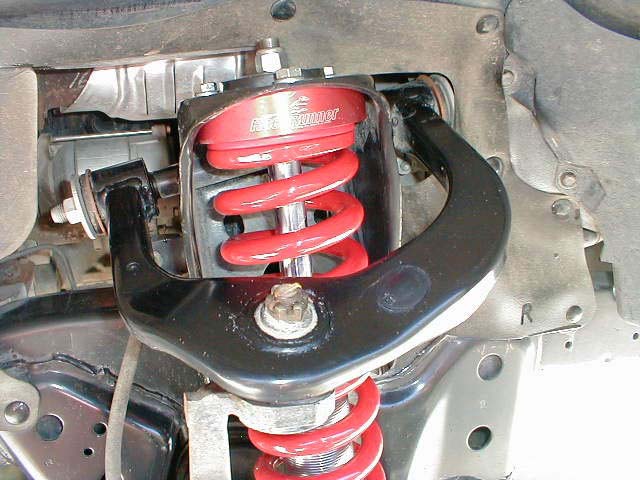 |
7. Tighten the top (3) mounting bolts.
8. At this point, you can put the wheels back on, move the truck enough to settle the suspension, and take a measurement of the height using the method in step 1 of part 1.
Or - you can adjust the collars to a specific height now. I chose to test the height to find out how much lift I had gained and how much more that I needed. But this may be an unnecessary step
that does take some more time. Adjustments will probably vary on each truck depending on the weight of the vehicle, etc. but for my truck, 3.0" of exposed thread between the red anodized bottom
mount and the bottom of the aluminum adjustment collar netted a total of 2.25" of lift.
9. Before adjusting the collars, you have to take the weight off the front suspension. Use the floor jack if you have already put the wheels back on.
10. If the wheels are on, turn them so the side that you are working on has the wheel turned away from the front of the truck (left for the driver's side, right for the
passenger's side).
|
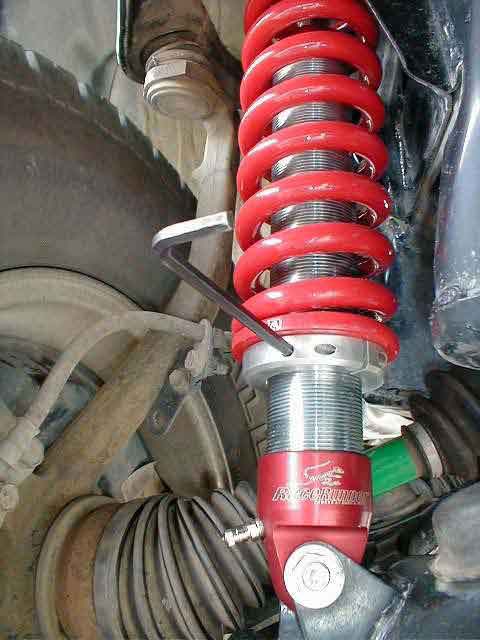 |
11. If you have the spanner wrench as referred to by the manufacturer, you may use it now. If you do not have a spanner wrench, insert the short end of the ¼"
allen wrench into the collar and turn the collar (if you were on the ground looking up at the collar, it would be clockwise rotation). You may need to tap the allen wrench with the hammer to
get it to seat firmly in the hole. You can use the cloth rag as padding for your hand while turning the allen wrench. Keep turning and periodically measuring to achieve the desired height.
Supposedly, the 4x4's can be adjusted to lift the truck 2" and the 4x2 trucks can be adjusted to lift the truck up to 3.5". I initially adjusted mine to show 2.25" of thread and this netted
me 1.5" of lift, but I eventually settled on 2.25" of lift (3" of thread showing) as mentioned in step 7. After the adjustments are made, tighten the small set-screw that is tapped into the
side of the collar. Put the wheels back on (if they are still removed) and drive the truck a little bit to settle the suspension. Measure to make sure that the wheel-to-fender dimension is
the same on both sides and check to see that the desired lift is achieved. |
|
12. After you are satisfied with the installation, it is a good idea to get a wheel alignment done.
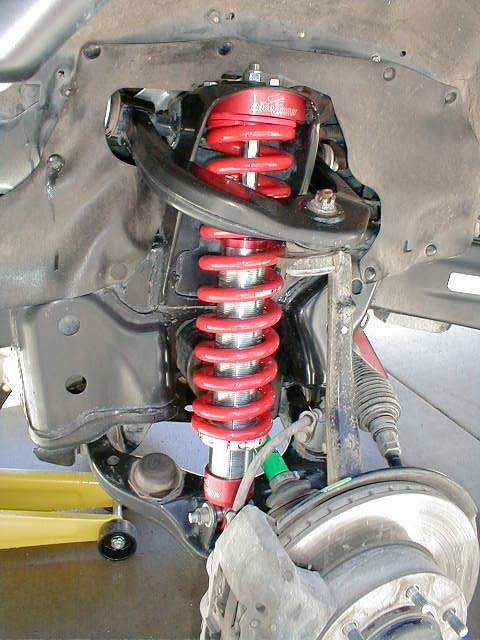
A pic of the finshed installation!
|
 |
SOME THINGS TO CONSIDER: The more you lift - the more the springs are compressed, decreasing the travel of the spring and increasing the chance of "coil slap"
where the coils touch each other under compression. The more you compress the coils, the more you push the A-arms down, thereby decreasing down-travel. Also, the more you lift, the more you increase the CV (constant velocity) joint angle, which can damage the CV boots and
ultimately your CV joints, especially if you have ADD (automatic disconnecting differential) where the CV joints constantly spin. It can also place added stress on the working parts. If you have manual hubs then this is not as much of an issue. If you have 2wd, then it isn't an issue at all. I personally lifted my truck (a '98 4x4 Tacoma with ADD) 2.25" and the fins on the CV boots appear to be rubbing, but if you take a thin piece of paper (like a dollar bill) you can slide it between the fins without any binding. You will also note that under normal conditions, (even with no lift) that when you turn the wheels, the fins on the CV boots make an enormous amount of contact, so contact is inevitable. It just depends on how much of a percentage that you want to increase the contact above normal.
You may notice a lot of squeaking from the upper polyurethane bushings on the SAW's when they are new on your truck. I have read that some people have used spray silicone to
remedy this, but I never tried it myself. Personally, I didn't mind the squeaking considering the huge improvement in front end performance. The squeaking noise eventually went away after the bushings had time to break in. Regarding the sway bar removal - I could not tell much of a difference at all until I had the truck up at higher speeds and quickly turned the
wheels (as may be needed to do to avoid an accident at some time). When this occurred, the truck definitely seemed unstable, and for this reason I went ahead and installed a pair of Nuke's sway bar quick disconnects, for the sake of safety. The quick disconnects give the best of both worlds, allowing you to leave the sway bar permanently mounted on the truck for street driving, and then disconnecting the linkage to the lower A-arm for added travel when off-road.
Back to the Suspension page
Home